This article is
split into the following 3 parts:
1/3 The Journey to SQL 2008 R2
2/3 Installing vCenter SSO and Inventory Service
3/3 Installing vCenter 5.1 and Database Upgrade


4.7) By expanding the specific database tree, right-click Security and New > User…, give the accounts the following permissions:

1/3 The Journey to SQL 2008 R2
2/3 Installing vCenter SSO and Inventory Service
3/3 Installing vCenter 5.1 and Database Upgrade
Setting the
Scenario
We have a vCenter 4 running on Windows Server 2003 32-bit
and with the “vCenter Server” database sitting on a remote Microsoft SQL Server
2005 32-bit instance. We want to migrate to the latest version of VMware’s
vCenter – vCenter 5.1a – which requires a 64-bit O/S. At the same time we want
to move the database from the old SQL Server 2005 to a new SQL Server 2008R2.
Additionally we want to keep the vCenter name and IP Address.
Image: start of the
scenario with 32-bit vCenter and SQL server

Image: end of the
scenario with 64-bit vCenter and SQL server

Checking on the Checking
on the VMware Product Interoperability Matrixes – the vSphere 4.0 U1 to 5.1
has a supported upgrade path.
Image: Supported
Upgrade Paths from vCenter 4.0 and 4.0 U1 to 5.1

A minor detail and
not important as part of this scenario – we will be using a local administrator
and domain user account – vcservice – to install vCenter and for Windows
services. The SQL servers were similarly installed with a local administrator
and domain user account – sqlservice.
What we have in
the Beginning
We start off with:
- vCenter 4.0 32-bit server
- Microsoft SQL Server 2005 32-bit
- Built Windows Server 2008R2 machine
- Microsoft SQL Server 2008R2
The vCenter version we currently have is 4.0u1 (the only
reason why it is U1 is because I happened to have a copy in my ISO library.) In
our lab we have 3 running VMs which will remain running throughout the upgrade.
Image:
VCENTER.test.priv – 4.0.0, 208111

1) Decommissioning
the vCenter 4.0.0
1.1) Copy the contents of the folder –
C:\Documents
and Settings\All Users\Application Data\VMware\VMware Virtual Center\SSL\
– from the Windows Server 2003 vCenter to a folder –
C:\Programdata\VMware\VMware
VirtualCenter\SSL
– on the Windows Server 2008R2 box intended as the
vCenter 5 server (you will have to create the folder)
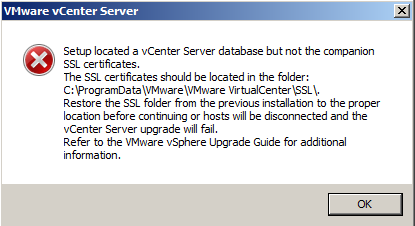
If the above is not done, then you will get the error
below regards “setup (has not) located … the companion SSL certificates” when
you come to install vCenter Server 5.0 or above
Image: vCenter
Server error regards no companion SSL certificates
1.2) Shutdown the old vCenter 4.0
1.3) Reset the computer account in Active Directory
Image: VCENTER –
Reset Account
2) Preparing
the new vCenter 5.1 Server
2.1) Name the Windows 2008R2 Server that has been
prepared as “VCENTER”
2.2) Give the new “VCENTER” the same IP as the old one
2.3) Join “VCENTER” to the domain
2.4) Install the ‘.NET
Framework 3.5.1’ feature
Image: Adding .NET
Framework 3.5.1 (be sure to leave WCF Activation unchecked)
2.5) Install the SQL Server 2008R2 Native Client – sqlncli_amd64.msi
Image: SQL Server
2008 R2 Native Client MSI

3) Migrating
the Database
3.1) On SQL 2005 Server, open up SQL Server Management
Studio
3.2) Right-click the VCDB and select detach (uncheck ‘
Image: Detaching
the VCDB database
Uncheck ‘Keep Full Text Catalogs’ and click OK
Image: Database
detach options

3.3) Copy the VCDB.mdf and VCDB_log.ldf to the SQL 2008R2
Server
Image: VCDB
Database files
3.4) On SQL 2008R2 Server, open up SQL Server Management
Studio
3.5) Right-click Databases and choose ‘Attach…’
Image: SQL Server
Attach…
Click ‘Add…’ and point to the location of the VCDB.mdf,
then click OK
Just click OK is
you get the warning about full-text catalogs!
4) Preparing
SQL 2008R2 for vCenter and SSO
4.1) Mount the vCenter Server 5.1a ISO to the SQL 2008R2
server
4.2) Browse to the folder:
E:\Single
Sign On\DBScripts\SSOServer\schema\mssql
4.3) With SQL Server Management Studio still open,
double-click on the –
rsaIMSLiteMSSQLSetupTablespaces.sql
– this will open the following script in the Query pane:
USE MASTER
GO
CREATE DATABASE RSA ON PRIMARY(
NAME='RSA_DATA',
FILENAME='C:\CHANGE ME\RSA_DATA.mdf',
SIZE=10MB,
MAXSIZE=UNLIMITED,
FILEGROWTH=10%),
FILEGROUP RSA_INDEX(
NAME='RSA_INDEX',
FILENAME='C:\CHANGE ME\RSA_INDEX.ndf',
SIZE=10MB,
MAXSIZE=UNLIMITED,
FILEGROWTH=10%)
LOG ON(
NAME='translog',
FILENAME='C:\CHANGE ME\translog.ldf',
SIZE=10MB,
MAXSIZE=UNLIMITED,
FILEGROWTH=10% )
GO
EXEC SP_DBOPTION 'RSA', 'autoshrink', true
GO
EXEC SP_DBOPTION 'RSA', 'trunc. log on chkpt.',
true
GO
CHECKPOINT
GO
4.4) Change the RSA name in the ‘CREATE DATABASE RSA‘ line and two ‘EXEC SP_DBOPTION‘ lines, and the three ’CHANGE
ME‘ lines as per requirements. In this instance, the lines were changed
as follows:
CREATE DATABASE VMware_SSO ON
PRIMARY(
FILENAME='M:\DATABASE\VMware_SSO_Data.mdf',
FILENAME='M:\DATABASE\VMware_SSO_Index.mdf',
FILENAME='L:\LOGS\VMware_SSO_Log.ldf',
EXEC SP_DBOPTION 'VMware_SSO', 'autoshrink', true
EXEC SP_DBOPTION 'VMware_SSO', 'trunc. log on chkpt.', true
4.5) Once you’ve made the required changes to the script,
hit the “!
Execute” button and you should be greeted with a “Command(s) completed
successfully” message and – after refreshing the Databases folder – see the
VMware_SSO Database created.
Image: VMware SSO
DB created

4.6) Create 3 SQL Server authentication logins by
right-clicking the ‘Security’ folder and choosing New Login…
Login name: vmware with default database = VCDB
Login name: SSO_User with
default database = VMware_SSO
Login name: SSO_DBA with
default database = VMWare_SSO
Be sure to uncheck the ‘Enforce password expiration’!
Image: SQL Server
Management Studio – New Login

4.7) By expanding the specific database tree, right-click Security and New > User…, give the accounts the following permissions:
vmware user –
VCDB: Schema db_owner
vmware user –
VCDB: Database role db_owner
vmware user – msdb:
Database role db_owner
SSO_User –
VMware_SSO: Database role db_owner
SSO_DBA –
VMware_SSO: Schema db_owner
SSO_DBA –
VMware_SSO: Database role db_owner
Image: SQL Server
Management Studio – Adding User Permissions
Comments
Post a Comment