Here we run through setting up SnapDrive for Windows (SDW)
on a Windows 2008R2 SP1 server, to manage VMDKs that exist on NFS datastores
provisioned on NetApp storage.
Note: SnapDrive for
Windows cannot create the VMDKs on NFS. The VMDKs must first be created in
vCenter; and then set online, initialized, and formatted in Windows disk
Management.
Versions used
in this lab
- VMware vSphere 5.1
- Windows 2008R2 SP1
- NetApp Data ONTAP 8.1.2 7-Mode
- NetApp Virtual Storage Console 4.1
- NetApp SnapDrive for Windows 6.5
Note: Check out the
NetApp Interoperability Matrix Tool (IMT) at http://support.netapp.com/matrix
for supported configurations!
Starting Point
- The snapdrive_windows license is installed on the
NetApp controller
- Newly provisioned Windows 2008R2 SP1 server with
Windows Updates
- VMware Tools installed
- Domain joined
- A domain user account LAB\srv_snapdrive created
- srv_snapdrive placed in the local administrator group
on the server where we are installing SDW
- IPv6 is disabled
- Windows firewall is turned off on all profiles
- UAC (User Account Control) is turned off
- .NET Framework 3.5.1 feature is installed
Image: Select .NET
Framework 3.5.1 only
Note: Being a lab
machine this has no installed anti-virus!
Installation
Walkthrough
Part 1:
Configuration on the Storage Controller
SnapDrive works most simply via RPC. Here we have CIFS
already enabled and configured on the storage system (via cifs setup) and we want to add the
LAB\srv_snapdrive service account to the administrators group on the controller.
The command is:
useradmin domainuser add LAB\srv_snapdrive -g administrators
Part 2: Installation
of SnapDrive for Windows
Note: Here we are
logged on as the LAB\srv_snapdrive account!
1: Double-click on
SnapDrive6.5_x64
Image:
SnapDrive6.5_x64.exe
2: SnapDrive -
Installation Wizard (SDIW):
2.1 Welcome to the SnapDrive Installation
Click Next >
2.2 License Agreement
Accept and click Next >
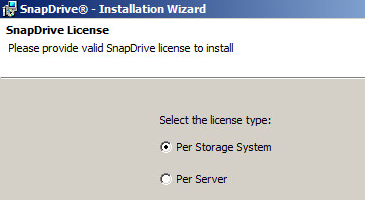
2.3 SnapDrive License
Here we select ‘Per Storage System’ and click Next >
Image: SDIW License
2.4 Customer Information
Enter User Name and Organization and click Next >
2.5 Destination Folder
Chose where to install SnapDrive (default is C:\Program
Files\NetApp\SnapDrive\) and click Next >
2.6 VirtualCenter or ESX Server Web Service Credentials
DO NOT SELECT ‘Enable VirtualCenter or ESX Server Settings’ -
this is only for if you are using iSCSI or FC attached RDMs!
And click Next >
Image: SDIW VC or
ESX Credentials
2.7 Virtual Storage Console Details
Select ‘Enable Virtual Storage Console Details’
and enter IP address and port of the VSC, and click Next >
Image: SDIW VSC
Details
2.8 SnapDrive Service Credentials
Enter the SnapDrive service account and password, and
click Next >
Image: SDIW Service
Credentials
2.9 SnapDrive Web Service Configuration
Specify SnapDrive Web Service Configuration and click
Next >
Image: SDIW Web
Service Configuration
2.10 Transport Protocol Default Setting
Since we have already added our Windows domain account
LAB\srv_snapdrive on the storage controller, tick ‘Enable Transport Protocol
Settings’ and choose RPC, and click Next >
Image: SDIW
Transport Protocol Setting
2.11 OnCommand Configuration
Leave unchecked ‘Enable Protection Manager Integration’
and click Next >
Note: DFM/Protection
manager cannot be used to manage SnapVault-ing of VMDKs on NFS!
2.12 Ready to Install the SnapDrive Application
Click Install!
2.13 SnapDrive Installation Completed
Click Finish!
Tip: If you
encounter problems with slow/hanging SnapDrive service on restart, check that
the ‘WinHTTP Web Proxy Auto-Discovery Service’ is started and set to Automatic
start (due to Microsoft Security update MS12-074 which added a dependency on
the WinHTTP service.)
Verifying Disks
in the SnapDrive MMC
All being well, when you open the SnapDrive MMC and click
to expand ‘Disks’, all the VMDKs on NFS attached to this Virtual Machine should
be visible! Nice and simple!
Image: SnapDrive
Icon
Image: SnapDrive
for Windows using VMDKs on NFS
A Few Notes More
Q1: Do Storage
Systems need to be individually specified under ‘Transport Protocol Settings’?
A1: No!
Image: No Storage
Systems specified here. We’re using RPC for default settings.
Q2: Do you need to
run the below?
A2: No!
Via the Windows DOS
prompt at:
C:\Program Files\NetApp\Snapdrive> sdcli
smvi_config set -host VSC_Server_IP
Q3: I’m getting “Loading SnapDriveRes.dll failed” error when I try to
run sdcli, why?
A3: Check the
server has had a reboot after turning of UAC.
Q4: How to restart
the SnapDrive service?
A4:
net stop SWSvc
net start SWSvc
Q5: Does it matter
if the VMware Paravirtual SCSI driver is used?
A5: No!Q6: Does Microsoft iSCSI Initiator need to be enabled?
A6: No!


Good to have something to refer to and check against. Thanks for taking the time to post all of this here, very useful.
ReplyDeleteMick Dann
Good day, Vidad
ReplyDeleteCould you insert the drawings of network architecture for post?
I hope to see that has access/connect to what (Netapp, vCenter, DC and other...)
Many thanks.
Hi,
ReplyDeleteAnyone got an error 'the remote server returned an error 407 proxy authentication required when you enable virtualcenter or ESX server settings for a virtual machine
Please help
Robin
HI
ReplyDeleteFirstthank you ver maych for the manual!! shapo !!!
but
after installation i can see th C vmdk drive that install on NFS drive on netapp1.
I can't see the other disks that on nfs on netapp 2 (netapp cluster)
Eny Idea ??
Erez
So far I found half of th answer.
ReplyDeleteI found that SnapDrive doesn't support dynamic disk.
When we converted the disk to basic disk it worked fine and the snapdrive found all the basic disks.
Still checkin.
Also I sound today that GPT is not supported by netapp %$#%$#%$
:-)
Erez