It’s fairly typical
in Enterprise IT environments that the provided Windows 7 desktops are locked
down. This blog post walks through installing the Data ONTAP PowerShell Toolkit
in such an environment, where there are certain restrictions, but fortunately
not enough to stop us from installing and using the Data ONTAP PowerShell
Toolkit.
Data ONTAP
PowerShell Toolkit Requirements
System
Requirements:
1) .NET 3.5
2) PowerShell 2 or higher
Windows 7 has .NET 3.5 by default.
Using PowerShell 2 must be permitted on the corporate
desktop.
Windows 7
Desktop Setup
In order to run the DataONTAP module in PowerShell, the
Execution Policy must be set to unrestricted.
Check by running:
PS C:\> Get-ExecutionPolicy
If it says Restricted, you’ll need to turn off UAC (User
Account Control), reboot and then run:
PS C:\> Set-ExecutionPolicy unrestricted
This may be where you’ll encounter a problem with your
corporate desktop - you may not be able to turn off UAC! If you’re in luck and
the Execution Policy is already/now unrestricted, we can continue.
Downloading the
Data ONTAP PowerShell Toolkit
Note: The latest
version at the time of writing is 3.3.1 from 18-Apr-2014
Go to:
The Data ONTAP PowerShell Toolkit comes in two forms - an
MSI file and a ZIP file. The MSI is super simple to install, but if your
corporate security policy blocks downloading MSIs -
Image: Download MSI
Security Alert
- then hopefully it will let you download the
DataONTAP.zip file. And we carry on from having downloaded the ZIP file.
Installing the Data ONTAP
PowerShell Toolkit from DataONTAP.zip
Important! Before unzipping, click the ‘Unblock’
button from the file properties.
Image: File
Properties -> Unblock
Unzipping DataONTAP.zip reveals a folder inside called
DataONTAP with a few other folders and files in (mostly DLLs.) Copy this
folder.
The Data ONTAP PSTK can be installed in two locations:
1) C:\WINDOWS\system32\WindowsPowerShell\v1.0\Modules
2) C:\Users\USERNAME\Documents\WindowsPowerShell\Modules
{Where USERNAME =
your username}
Note: In Windows 7
the document folder that displays as ‘My Documents’ is Documents
Assuming the corporate security policy blocks adding
stuff into system32 (also, perhaps you only want this for your login); here
we’ll use option 2.
Firstly, create the folder structure \WindowsPowerShell\Modules in Documents if it does not exist.
Then copy the DataONTAP folder into:
C:\Users\USERNAME\Documents\WindowsPowerShell\Modules
Data ONTAP in
PowerShell
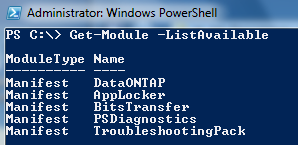
In PowerShell, run the command:
PS C:\> Get-Module -ListAvailable
DataONTAP should be listed.
Image: PowerShell
Modules
Finally, to import the DataONTAP PowerShell module:
PS C:\> Import-Module DataONTAP


Comments
Post a Comment