In order to try out the latest version of ONTAP - with ONTAP
9.3RC1 being the latest as I write this - then you’ll need to upgrade the ONTAP
Simulator (assuming you don’t have suitable hardware to play with). Fortunately
it is very easy to do this and to get a basic cluster setup up and running.
Note: Here I show
you my way - there are other ways.
Walkthrough
1) Download the latest version of the simulator from:
Since I’m using
VMware Workstation, I go for:
Simulate ONTAP 9.2
for VMware Workstation, VMware Player, and VMware Fusion (vsim-netapp-DOT9.2-cm.ova)
2) Download the ONTAP 9.3RC1 from:
The file is: 93RC1_q_image.tgz
3) Open the downloaded vsim-netapp-DOT9.2-cm.ova in VMware Workstation, and follow the
prompts to import the VM.
4) (If you need to) Modify any hardware settings
(networks, add extra vNICs).
5) Power on the VM
6) (Optional) Press
{SPACE} at the “Hit [Enter] to boot immediately...” to get to the VLOADER>
prompt
7) (Optional) A few
things I like to do at the VLOADER> prompt - enable to use more and larger
vDisks, and allow the VM to power itself off:
setenv bootarg.sim.vdevinit
31:14:0,31:14:1,31:14:2,31:14:3
setenv bootarg.vm.sim.vdevinit
31:14:0,31:14:1,31:14:2,31:14:3
setenv bootarg.vm.no_poweroff_on_halt false
boot
8) When prompted, press Ctrl-C to access the boot menu
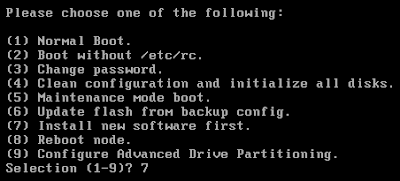
9) From the Boot Menu select option (7) “Install new software first”, and follow the prompts to install
ONTAP 9.3RC1.
Note: You need to
have already presented the ONTAP image via a webserver for this step (if you
don’t have a webserver, Mongoose.exe from https://cesanta.com/
is good and light, or you could try hfs.exe
which I’m using here)
... Do you want to continue? y
... port ... for the download? e0c
... Reboot now? y
Enter the IP address for port e0c: 10.9.3.11
Enter the netmask...: 255.0.0.0
... default gateway: 10.0.0.1
What is the URL for the package? http://10.0.0.1/93RC1_q_image.tgz
... user name ... if any?
... default ... for subsequent reboots? y
... reboot now? y
Image: Boot Menu
from ONTAP 9.2 SIM
10) When prompted, press Ctrl-C to access the boot menu
11) From the Boot Menu select option (4) “Clean configuration and initialize all disks”, and follow the
prompts.
Zero disks...? y
... are you sure? y
And wait...
12) Complete the node setup part of the “cluster setup
wizard”:
Type yes to confirm and continue? y
Enter the node management interface port? e0c
Enter the node management interface IP address: 10.9.3.11
Enter the node management interface netmask: 255.0.0.0
Enter the node management interface default gateway: 10.0.0.1
A node management interface ... has been created.
13) I don’t like using the VM console any more than I
have to, so at this point press Ctrl+C
and login as “admin”.
14) To enable SSH, run the following commands::>
security
login password
security
login create -vserver Default -user-or-group-name admin -application ssh
-authmethod password -role admin
15) Now connect via SSH to the node management IP.
16) Create the cluster::>
cluster
create -clustername C93A -node-count 1
Note 1: ‘Cluster Setup’
kept on prompting for node management addressing, then kicked me out of SSH,
hence using the cluster create.
Note 2: I did try
the Guided Setup with the 9.3RC1 SIM, but it wouldn’t discover my node.
17) Basic cluster setup.
The following commands:
- Create a cluster management LIF
- Configure cluster DNS
- Configure timezone
- Configure NTP
- Assign disks
- Create a couple of data aggregates
- Install the feature licenses from the 9.2 SIM (with
serial: 4082368507)
net
int create -vserver C93A -lif cluster_mgmt -role cluster-mgmt -home-node
C93A-01 -home-port e0c -address 10.9.3.10 -netmask 255.0.0.0
vserver
services name-service dns create -domains lab.priv -name-servers 10.0.1.10
timezone
-timezone Europe/London
cluster
time-service ntp server create -server 10.0.1.10
disk
assign -all true -node C93A-01
aggr
create -aggregate data1 -diskcount 26 -maxraidsize 26
aggr
create -aggregate data2 -diskcount 26 -maxraidsize 26
license
add YVUCRRRRYVHXCFABGAAAAAAAAAAA # CIFS
license
add WKQGSRRRYVHXCFABGAAAAAAAAAAA # FCP
license
add SOHOURRRYVHXCFABGAAAAAAAAAAA # FlexClone
license
add YBSOYRRRYVHXCFABGAAAAAAAAAAA # Insight_Balance
license
add KQSRRRRRYVHXCFABGAAAAAAAAAAA # iSCSI
license
add MBXNQRRRYVHXCFABGAAAAAAAAAAA # NFS
license
add QDDSVRRRYVHXCFABGAAAAAAAAAAA # SnapLock
license
add CYAHWRRRYVHXCFABGAAAAAAAAAAA # SnapManager
license
add GUJZTRRRYVHXCFABGAAAAAAAAAAA # SnapMirror
license
add OSYVWRRRYVHXCFABGAAAAAAAAAAA # SnapProtect
license
add UZLKTRRRYVHXCFABGAAAAAAAAAAA # SnapRestore
license
add EJFDVRRRYVHXCFABGAAAAAAAAAAA # SnapVault
And we’re done!
APPENDIX: What’s behind option (9) Configure Advanced
Drive Partitioning?
Image: Advanced
Drive Partitioning Boot Menu Options


Comments
Post a Comment