The following notes
were taken whilst upgrading my lab WFA 2.2RC1 box to WFA 2.2GA. The notes apply
pretty much to any upgrade from WFA 2.0/2.X to 2.X (pre 2.0 WFA must be upgraded
to 2.0 first.)
Part 1) Backup the WFA Database
A WFA user with the
role admin or backup can do this.
Image: WFA User
Roles

Method 1: Using the Web Portal
Log in to the WFA web portal (i.e. https://WFASERVER)
Click
Administration
Click Backup &
Restore
Image: WFA Backup
& Restore

Click Backup
And save the file to an accessible location (example
filename - WFA_V2.2.0.2.4RC1_B2298704_05_25_14__11_08_22.sql.gz).
Image: WFA Backup

Method 2: Using PowerShell script
From a PowerShell prompt (i.e. PS C:\>):
& 'C:\Program
Files\NetApp\WFA\bin\Backup.ps1' -user backup -password ********* -path
C:\Backups\WFA_Backup_20140525
Note 1: Execution policy must be set to unrestricted -
see with the PS command:
Get-ExecutionPolicy
- if this is not already so, first check if UAC is on,
if UAC is on turn it off and reboot. Then run the PS command:
Set-ExecutionPolicy unrestricted
Image: WFA
PowerShell Backup

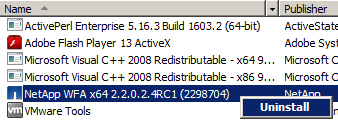
Part 2) Uninstall the Existing Version of WFA
Start > Control Panel > Programs and Features >
Right-click the existing version of WFA
Select Uninstall
Image: Uninstalling
WFA
Yes to ‘Please
make sure to take a backup before...’
Yes to ‘Are
you sure...’
OK to ‘WFA was
successfully removed...’
Image: Uninstall
Successful

Part 3) Install the New Version of WFA
This is a re-hash
of the Installation part of this post: OnCommand
Workflow Automation 2.2RC1 - Quick Install Guide
Download the software package from:
Installing the software:
Double-click the downloaded WFA-x64-V2.2.0.2.6-B2416155.exe
Setup - WFA: Welcome to the WFA Setup Wizard
Click Next >
Setup - WFA: License Agreement
Accept the agreement
Click Next >
Setup - WFA: Server Configuration
Override the default server configuration or leave as
default (HTTP Port 80 and HTTPS Port 443)
Click Next >
Setup - WFA: Checking Prerequisites
Click Next >
Setup - WFA: Customer Information
Enter ‘Site Name’
Enter ‘Company Name’
Click Next >
Setup - WFA: Administrator User
Create a user by providing -
Username: admin (default)
Password: *********
Click Next >
Setup - WFA: Select Destination Location
Leave as or change the default (C:\Program Files\NetApp\WFA)
Click Next >
Setup - WFA: Ready to Install
Click Install
Setup - WFA: Please read …
Click Next >
Setup - WFA: Completing the WFA Setup Wizard
Click Finish
Part 4) Restore the WFA Database
Log in to the WFA web portal (i.e. https://WFASERVER)
Click Administration
Click Backup &
Restore
Under ‘Restore’
Click Browse...
and browse to the backup file
Click Restore
Image: Restore WFA’s
Database

The portal will go grey, you’ll notice mysqld.exe and
NA_WFA_SRV.exe in ‘Windows Task Manager’ running at a high CPU% utilization,
and then - finally - will receive the message in the web portal:
Successfully restored WFA's database from file:
wfa_backup.sql.gz
PS OnCommand
Workflow Automation is an awesome and completely free automation tool.
does upgrading cause all workflow UUIDs to be recalculated? someone from netapp told me this, i really dont want to believe it. sounds outrageous
ReplyDelete