Part A: Setting a New Assessment
1: Go to https://optimize.vmware.com and login with your credentials

2: From the Home page, select ‘Start new assessment’

3: Enter the company details, we shall select Consolidation Analysis (CA), and click ‘Next >’

4: Grant Access to users who can view and manage the assessment , and click ‘Next >’

5: We’ll skip the Select Notifications bit for this one – click ‘Next >’

6: We’ll skip the Select Subscriptions bit for this one – click ‘Finish’

Part B: Downloading and installing the collector
1: Log on to a server where the assessment is to be run,
login to https://optimize.vmware.com , click on 'Portal' in the top right corner
under Resources → Product Downloads, download the VMware Capacity Planner Collector

2: Run the exe
3: Click 'Next >' on the initial screen

4: Accept the License Agreement → Click 'Next >'
5: Choose a Destination Folder to install to → Click 'Next >'
6: Configure Collector Service Account credentials → Click 'Next >'

7: Click 'Install'
8: Click 'Finish'
Part C: Configuring the VMware Capacity Planner Data Manager
1: Double-click on the 'VMware Capacity Planner Data Manager' icon on the desktop, or access via Programs.
You will be presented with a screen like the below
Configuring is just a case of running through the 7 steps

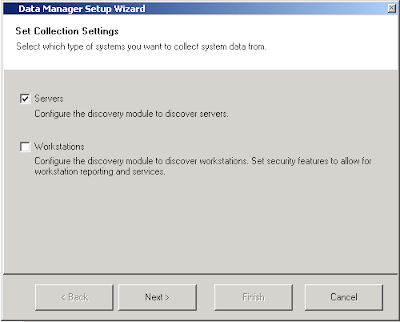
1: Setup Wizard


2: Click Import Systems or Discover Domain Discover Systems
(If not run automatically when finished Task 1)
3: Click Test Collection View Test Collection Results
4: Click Collect Inventory Data
5: Click Collect Performance Data
6: Click Register Collector
A Register Collector window (see below) will pop-up
Instructions for 'if you are doing a full assessment'
i: Choose Administration → Collector → Register Database Ids
ii: On the Administration – Database ID Registration screen, click Add
iii: Paste the ID in the field provided and click OK


Click Verify Collector
7: Click Synchronize Data
To ensure data is regularly synchronized, from the VMware Capacity Planner Data Manager, go
Admin → Options → 'Jobs' tab → untick 'Suspend Scheduler'

1: Go to https://optimize.vmware.com and login with your credentials

2: From the Home page, select ‘Start new assessment’

3: Enter the company details, we shall select Consolidation Analysis (CA), and click ‘Next >’

4: Grant Access to users who can view and manage the assessment , and click ‘Next >’

5: We’ll skip the Select Notifications bit for this one – click ‘Next >’

6: We’ll skip the Select Subscriptions bit for this one – click ‘Finish’

Part B: Downloading and installing the collector
1: Log on to a server where the assessment is to be run,
login to https://optimize.vmware.com , click on 'Portal' in the top right corner
under Resources → Product Downloads, download the VMware Capacity Planner Collector

2: Run the exe
3: Click 'Next >' on the initial screen

4: Accept the License Agreement → Click 'Next >'
5: Choose a Destination Folder to install to → Click 'Next >'
6: Configure Collector Service Account credentials → Click 'Next >'

7: Click 'Install'
8: Click 'Finish'
Part C: Configuring the VMware Capacity Planner Data Manager
1: Double-click on the 'VMware Capacity Planner Data Manager' icon on the desktop, or access via Programs.
You will be presented with a screen like the below
Configuring is just a case of running through the 7 steps

1: Setup Wizard


2: Click Import Systems or Discover Domain Discover Systems
(If not run automatically when finished Task 1)
3: Click Test Collection View Test Collection Results
4: Click Collect Inventory Data
5: Click Collect Performance Data
6: Click Register Collector
A Register Collector window (see below) will pop-up
Instructions for 'if you are doing a full assessment'
i: Choose Administration → Collector → Register Database Ids
ii: On the Administration – Database ID Registration screen, click Add
iii: Paste the ID in the field provided and click OK


Click Verify Collector
7: Click Synchronize Data
To ensure data is regularly synchronized, from the VMware Capacity Planner Data Manager, go
Admin → Options → 'Jobs' tab → untick 'Suspend Scheduler'

And then wait....
Author V. Cosonok
Good guide thanks
ReplyDeleteThanks for the comment. The credit should really go to my colleague Naal Gunt (another anagram.)
ReplyDeletehey thanks for this guide. Screenshots do a lot more for me (and are quicker) than reading VMware's long-worded guides. Excellent!
ReplyDeleteThanks a lot for the detailed info..:-)
ReplyDeleteThanks..its help full for installation...
ReplyDelete